-
January 27th, 2004, 11:57 AM
#1
Chapter 6 - Engineers at Play
After all of the chatter today about driveshaft angle and interference, I figured that I should take this as a sign to enter my next chapter. As some of you noticed in the last photo of Chapter 5, the chassis of the Spence car has changed a little bit. Before I spill all of our secrets, let me provide a bit of background.
Unique 9122 was initially sold to our friend Spence back in December of 1991. Since that time several updates to the design have been made by the Weavers, including relocation of the rear trailing arms, elimination of the MG front suspension, brake upgrades, and other improvements. In addition to faithfully reproducing a Carroll Shelby race car, my Dad and I had decided that we wanted to update the car to current technology wherever prudent. A quick phone call to Maurice Weaver both loaded up my credit card and resulted in a big box on the front doorstep just after Christmas.
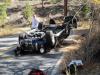
The rear suspension pivot brace and relocated trailing arms were the first modifications to be made on the 12 year old frame.

Before the Jag rear suspension was dropped out, we located and installed the rear pivot arm support. With a simple cut and a shower of sparks, the car felt a little bit more like ours. The feeling of mounting new parts was also a thrill as we recognized that the process of building had actually commenced. A few minutes with the angle grinder yielded a cleaned up and neatly radiused bracket. With this in place we turned our attention to something a little more exciting.
As mentioned in Chapter 5, we knew that a drive shaft interference problem existed on our car. The reason for this was a combination of the frame not having a relief cut like the current version and the transmission was sitting little low. All of this was easy to see from our vantage point, however, the original builder never had the body off the frame.
With our measurements double-checked twice, we broke out the Sawzall and angle grinder and let 'em rip. A mere 30 minutes later our fillet was clamped in place and is ready for welding. We allowed 2" of clearance from the bottom of the bolt circle and matched the radius of the pinion input.

Just below the drive shaft relief are the four bosses that we located for the rear sway bar, another update that showed up in the belated Christmas present that came from the Weavers.
As much fun as these changes were to make, the "piece de resistance" of our updates clearly shows the "engineers gone overboard" that is present in both my father and I. Our first sit in the Rescue Cobra two months ago clearly illustrated that the fiberglass floors of the body could use some additional reinforcement from below. Again, this is something that the earlier cars did not have. Most sane builders would have cut and welded in a flat plate and called it good. However, prescribing to the "too much is never enough" theory, my dad chucked up the ball cutting tool in the mill and beveled the edges of our 1/4" thick 4130 chromoly seat support pans.

The result you see is an edge which perfectly matches the radius of the frame stock. Sitting in the opening with no other support than a perfectly engineered fit, the supports are also ready to be welded in place. Tomorrow at lunch the welding will be completed and the frame will be almost ready for powder coating.

Our seat supports were not the only custom fit metal work that will be part of the Cobra. As mentioned in an earlier chapter our rusty cowl brace was removed in order to clean up the corrosion that had accumulated over 12 years of sitting. After cutting the brace to get it free of the body, a stainless steel plug was machined to match the inside dimensions of the tube and is held in place with allen head bolts. Although the plug has been adequately sized so as to be stronger than the tube around it,
-
January 27th, 2004, 12:40 PM
#2
I never doubted you for a minute  You guys obviously know what you are doing!
Phil
427 Roadster, #4279436
Southern Automotive FE
3:31 and Toploader
Roseville (N.Cal)
-
January 27th, 2004, 01:00 PM
#3
brian, awesome job. with what you have done already and have planned, it sounds like youll be totally upgraded to what the current chassis is. the only thing i can see that your missing from the current chassis are the tabs for mounting the outboard seat belts. as far as whats recomended and whats not in dissasembly and assembly, it looks like your skill level has pretty much made that a moot point. you got it pretty well covered from what i can see. enjoy the fun. later, brian
-
January 27th, 2004, 09:37 PM
#4
You guy's are doing a great job. Your making the right decisions and that will pay off in the long run. Are you going to switch to a manual transmission or stay with the automatic?
Eliminator
-
January 27th, 2004, 09:59 PM
#5
Looks like you are having just to much fun! Great mods to the car.
Rick
-
January 27th, 2004, 10:15 PM
#6
Hey guys: question - How much benfit do you get from the rear sway bar?
My car is a '93 and it has the trailing arm set up, but no sway bar.
WB
BTW:Looks like alot of fun - Brian
'93 Unique 427/351W/4sp
-
January 28th, 2004, 02:37 AM
#7
Very impressive work! Keep the post comming.
Brent
 Posting Permissions
- You may not post new threads
- You may not post replies
- You may not post attachments
- You may not edit your posts
-
Forum Rules


 Reply With Quote