Page 1 of 2 12 LastLast
Results 1 to 20 of 28

Thread: Part 7- Repairing the frame

  1. #1
    Join Date
    May 2005
    Location
    Roseville, Ca., USA.
    Posts
    523

    Part 7- Repairing the frame

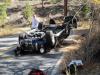
    In this section I will go over some of the repairs and/or changes that I am making to the frame. The previous owner added bracing that I will remove or change and cut away pieces (including the entire rear portion of the frame) that I need to replace.


    If you look close at the next picture, you will notice that the front body mounting tab is gone as well as the jack bar mount. I have no idea why this was done but figured this was a good place to start the repairs.


    This shot shows the newly fabricated parts welded on. With the body in place I am able to line up these items. I will finish any welding that I can't get to later, after the body is removed.


    to be continued.....
    Last edited by RJacobsen; November 29th, 2009 at 02:18 PM.
    Rod
    Roseville, Ca.
    289 FIA #9152 "The Flintstone Cobra"

  2. #2
    Join Date
    Dec 2004
    Location
    Prince Frederick, Maryland, USA.
    Posts
    1,561
    Any new progress Rod?
    Tony
    Unique 427 #4279480 Precision Engine Machine Company 427 s/o 483.47 stroker close ratio toploader 3.31 jag rear

  3. #3
    Join Date
    May 2005
    Location
    Roseville, Ca., USA.
    Posts
    523
    Tony, I'm afraid it's been hard to find time to work on the car lately. I've had alot of out of town work. But the best excuse I have for not working on the car was the arival of my first grandson on 3-4-2006, this is one thing thats way more fun than a Cobra.
    Attached Images Attached Images  
    Rod
    Roseville, Ca.
    289 FIA #9152 "The Flintstone Cobra"

  4. #4
    Join Date
    Dec 2004
    Location
    Prince Frederick, Maryland, USA.
    Posts
    1,561
    Handsome boy Rod! Congrates!
    Car can wait a little.
    Tony
    Unique 427 #4279480 Precision Engine Machine Company 427 s/o 483.47 stroker close ratio toploader 3.31 jag rear

  5. #5
    Join Date
    May 2005
    Location
    Roseville, Ca., USA.
    Posts
    523
    Thanks Tony. Yah, I'm having too much fun with the little guy but I'll get back at the car soon.
    Rod
    Roseville, Ca.
    289 FIA #9152 "The Flintstone Cobra"

  6. #6
    Join Date
    Dec 2003
    Location
    Rogers, AR, USA
    Posts
    577
    Rod,
    With the Spence car home from the paint shop I have been wondering lately about my "kindred spirit" rescue Cobra...Any progress lately? Hope to see you at the homecoming in the spring, we'll be there!
    Brian Carlson

    Unique 9122 - 289 FIA - 351W with 8 stack EFI - Formerly known as the "Legendary Spence Car"

  7. #7
    Join Date
    May 2005
    Location
    Roseville, Ca., USA.
    Posts
    523
    Brian, Thanks for thinking about me. I'm still here. I haven't done anything with the car lately that I thought was "post worthy", with the exception of a foot well widening project that I haven't quite finished. I will be working on the rear frame section repair very soon and be posting pictures of both projects. I'm glad that yours is coming along. It looks great. Thanks
    Rod
    Roseville, Ca.
    289 FIA #9152 "The Flintstone Cobra"

  8. #8
    Join Date
    May 2005
    Location
    Roseville, Ca., USA.
    Posts
    523
    I finally found some time to work on the car so moving now to the back of the frame. The following photos show the removable aluminum frame section that was made for the car.


    This piece had no provision for mounting the rear jack bars, was crudely made and offered little or no protection to the fuel tank.
    I started the repair by first getting some exact measurements from another car (thanks again Phil G.)
    The first thing to fabricate was the rear cross member with all of the suspension attachment brackets.

    Rod
    Roseville, Ca.
    289 FIA #9152 "The Flintstone Cobra"

  9. #9
    Join Date
    May 2005
    Location
    Roseville, Ca., USA.
    Posts
    523
    With that done it was time to weld it onto the frame. To align it properly with the rest of the frame I used my laser level (not just a carpentry tool anymore) and some homemade measuring targets.
    In the next photo you will see four rulers magnetically attached to the four corners of the main frame rails. By adjusting the laser level until I got the same reading on all four rulers I established a parallel plane to the main frame that I could measure from to position the rear cross member.


    The laser level,


    With the rear cross member at the correct height and proper distance from the back of the main frame I could then cut the side frame pieces and tack them into place.

    Rod
    Roseville, Ca.
    289 FIA #9152 "The Flintstone Cobra"

  10. #10
    Join Date
    May 2005
    Location
    Roseville, Ca., USA.
    Posts
    523
    The next thing to do was to make sure that the rear cross member was centered. To do that I fabricated two centerline targets that I attached magnetically to the front and rear of the main frame rails.


    Then by turning the laser on its side I was able to line up the two targets and establish a visible centerline for the entire frame.


    With everything aligned I then finished the welding.


    And finally the brackets to mount the jack bars and a small tab that I will drill and tap later for the trunk latch.


    To be continued.....
    Last edited by RJacobsen; January 4th, 2007 at 11:04 PM.
    Rod
    Roseville, Ca.
    289 FIA #9152 "The Flintstone Cobra"

  11. #11
    Join Date
    May 2005
    Location
    Roseville, Ca., USA.
    Posts
    523
    In case you're wondering, this is how the body goe's up and down

    Rod
    Roseville, Ca.
    289 FIA #9152 "The Flintstone Cobra"

  12. #12
    Join Date
    Sep 2004
    Location
    Bainbridge Island, WA, USA.
    Posts
    196
    Rod,

    Thanks for the update!. I was wondering how your project was coming along. Kudos for the photos, especially the mechanized body lifter. Please continue your periodic updates .... it's inspiring.

    Bob

  13. #13
    Join Date
    Sep 2003
    Location
    Roseville, CA, USA.
    Posts
    2,323
    Nice progress Rod! And thanks for the last picture - you obviously anticipated the question after looking over the other photos
    Phil

    427 Roadster, #4279436
    FE Specialties FE
    3:31 and Toploader (wide ratio)

    Roseville (N.Cal)

  14. #14
    Join Date
    May 2005
    Location
    Roseville, Ca., USA.
    Posts
    523
    Thanks Bob- I,ve been following along with the issues on your car, I hope all is well now. Are you headed for Reno again this year?
    Rod
    Roseville, Ca.
    289 FIA #9152 "The Flintstone Cobra"

  15. #15
    Join Date
    Nov 2003
    Location
    Mississippi Gulf Coast and Central Florida
    Posts
    2,154
    Nice work!! We appreciate the update.
    Paul

    289 USRRC
    1964 289 5-bolt block
    Toploader and 3.31 rear

  16. #16
    Join Date
    Sep 2004
    Location
    Bainbridge Island, WA, USA.
    Posts
    196
    Rod,

    I'm reluctantly going to pass on Reno this year. The combination of the earlier date increasing the prospects of rain on both ends of the journey and the fact that I have less than two hundred miles on the new motor tell me that I should shoot for 2008. Are you planning on going?

    Bob

  17. #17
    Join Date
    May 2005
    Location
    Roseville, Ca., USA.
    Posts
    523
    Bob, I do plan to go (its an easy 2 hour drive from here) but the car will probably not make it until 2008 .
    Rod
    Roseville, Ca.
    289 FIA #9152 "The Flintstone Cobra"

  18. #18
    Join Date
    Mar 2003
    Location
    Ridgecrest, CA, USA.
    Posts
    246
    Rod- I assume Phil G is also going to the WSCB. Look me up there too. Grey 289 with Cal plates PAT 058. Phil S

  19. #19
    Join Date
    Jul 2003
    Location
    Kansas City, MO, USA.
    Posts
    256
    Good gosh - and I thought just building a kit from a deluxe pallet would be challenging.

    Nice work Rod!
    Unique 289FIA - Chassis #9229 - Viking Blue

  20. #20
    Join Date
    Jan 2005
    Location
    Rosenberg, Texas, USA.
    Posts
    44

    My thoughts, too!

    Quote Originally Posted by Russ Dickey View Post
    Good gosh - and I thought just building a kit from a deluxe pallet would be challenging.

    Nice work Rod!
    My sentiments exactly--but I do want some of my sweat equity in the finished product, so that's what I plan on doing when the time is right.

    I'm not much for fabrication, but for those who manage to do so, my hat's off to you!! Suffice it to say I'm in awe of how you've done all this, Rod!

    Doug
    YD,E./PNB

    "Make no little plans; they have no magic to stir men's blood..." (Daniel H. Burnham)

Posting Permissions

  • You may not post new threads
  • You may not post replies
  • You may not post attachments
  • You may not edit your posts
  •