Results 1 to 19 of 19

Thread: Accusump installed

  1. #1
    Join Date
    Nov 2003
    Location
    La Plata, Maryland, USA.
    Posts
    421

    Accusump installed

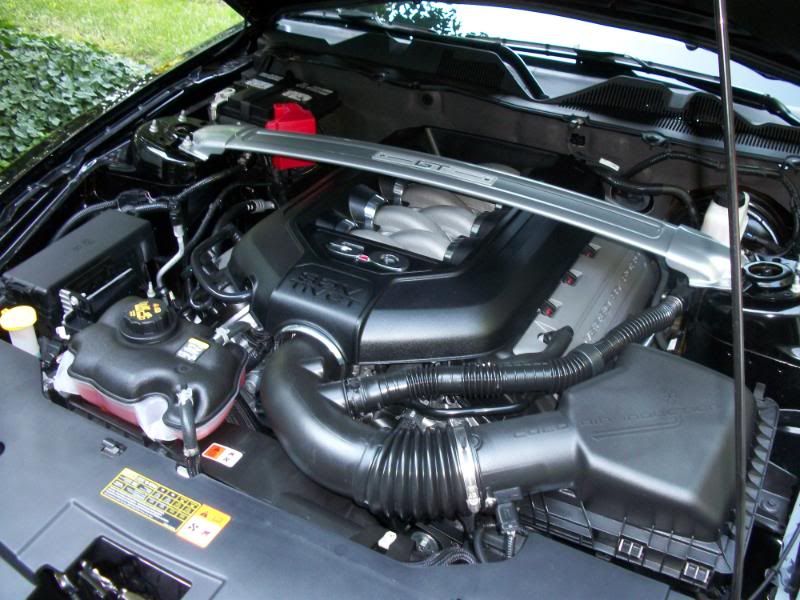
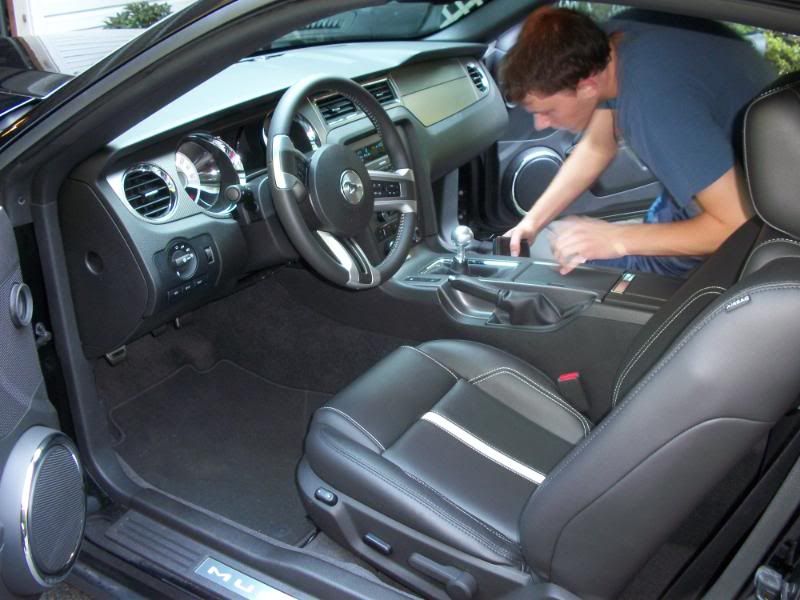
    For the past few months, I’ve been mulling over the idea of installing an oil accumulator in my car. I’ve heard the claims that say starting a ‘dry’ engine that has sat for a week or more causes more wear than driving hundreds of miles. True or false, I’ve always cranked my engine with the ignition off until I saw oil pressure on the gauge. Solves the problem of starting a dry engine, but that procedure has to take its toll on the starter. So a few weeks ago I put together a shopping list to install a Canton Accusump. Finding a suitable location and fabricating the mounts were what I thought would be the easiest task of this job. Assembling the braided lines and 10AN fittings would be the hardest….. I’ve always purchased assembled hoses when I could, and when I had to roll my own, I always had a hard time getting the hose properly installed in the socket. That turned out to be the easiest part. When purchasing the parts for this job, I saw a device made by Koul Tools. The manufacture claims, “These clever tools make installing the socket onto stainless braided hose almost effortless.” So I bought one. I got to say, it works as advertised. Put the socket in the “tool”, clamp it in the vise, and twist in the hose. In less than a minute, the hose and socket are joined. Even if the braid is slightly flaring out, the thing still works. If you’ve had issues with installing AN hose ends, get one of these Koul Tools.
    The location I chose was the 1 X 2 box tubing that runs between the shock mounts. I fabricated a couple mounts out of 1 1/4" X 3/16” flat steel, and screwed everything together with 5/16 X 24 AN bolts and insert nuts.
    Plumbing everything together went easy too. I now have instant oil pressure as I hit the starter. Next on the list will be an electric fuel pump. I still have to crank over the engine until the mechanical pump gets fuel into the bowls.
    Below are some pictures of the installation.
    Attached Thumbnails Attached Thumbnails Click image for larger version. 

Name:	Mounting Brackets.JPG 
Views:	100 
Size:	111.2 KB 
ID:	2340   Click image for larger version. 

Name:	Mount In Position.jpg 
Views:	127 
Size:	248.4 KB 
ID:	2341   Click image for larger version. 

Name:	Installed_1.jpg 
Views:	125 
Size:	252.0 KB 
ID:	2342   Click image for larger version. 

Name:	Installed_2.jpg 
Views:	105 
Size:	247.1 KB 
ID:	2343  

    Click image for larger version. 

Name:	One Way Valve and Tee.jpg 
Views:	100 
Size:	255.4 KB 
ID:	2344  
    Last edited by Jim Harding; August 15th, 2010 at 04:13 PM.
    Jim Harding
    #4279512 - SA452 - TKO600
    #3004 - 302 - 4 speed
    La Plata, Maryland

  2. #2
    Join Date
    Nov 2003
    Location
    Mississippi Gulf Coast and Central Florida
    Posts
    2,154

    Thumbs up

    Looks good, Jim!
    Paul

    289 USRRC
    1964 289 5-bolt block
    Toploader and 3.31 rear

  3. #3
    Join Date
    Apr 2010
    Location
    Navarre, Florida
    Posts
    284
    Jim, looks good. Thanks for the tip on the SS braided hose tool. Where did you buy it? I assume you have to buy a different one for each size. I'll be doing lots of that "plumbing" soon. I do have a question on your startup procedures.... when you turn the ignition on.... do you wait a second or two to let the accusump empty? I'm assuming the "ignition on" opens your accusump electric switch valve. Then you start? How long does it take to empty? Then I assume it would take a few seconds to fill back up with 3 qts of oil. Don't forget to empty the accusump before each oil change.

    Lastly, I see you're considering a elec fuel pump. I agree with you... did the same thing. Did you consider an oil thermostat before the oil cooler?
    Mark
    427 S/C, Flame Yellow, B2 Motorsports 427ci Stroker Dart SBF, TKO600, 3.73 Posi, Avon tires and so much more.

  4. #4
    Join Date
    Apr 2010
    Location
    Navarre, Florida
    Posts
    284
    Hey Jim.... I have another question.... how did you cut your ss braided hose?
    Thanks Mark
    427 S/C, Flame Yellow, B2 Motorsports 427ci Stroker Dart SBF, TKO600, 3.73 Posi, Avon tires and so much more.

  5. #5
    Join Date
    Sep 2003
    Location
    Roseville, CA, USA.
    Posts
    2,323
    Jim, nicely done!
    Phil

    427 Roadster, #4279436
    FE Specialties FE
    3:31 and Toploader (wide ratio)

    Roseville (N.Cal)

  6. #6
    Join Date
    Jan 2003
    Location
    Seattle, WA, USA.
    Posts
    1,083
    Here is how I cut my hoses when I do these things. Wrap masking tape tightly around the hose. Then use a skinny cutoff wheel on a pneumatic cutoff tool to slice through the tape. Take the tape off the piece your installing a fitting to. Leave te tape on the other side until you need to use it.

    As for electric fuel pumps, I highly recommend the Mallory 110 or 140 pumps. The 140 required a regulator. Both are high quality and very quiet. I've tried several brands in the past. These are now all I use. They even make an EFI version.
    Patrick Brown
    Forum Administrator


  7. #7
    Join Date
    Nov 2003
    Location
    La Plata, Maryland, USA.
    Posts
    421
    Thanks for the kind words guys.
    Mike, I purchased the AN hose ends, other fittings, nutserts and bolts and the Koul Tool from Pegasus Auto Racing ( pegasusautoracing.com ) . I bought the 'medium' tool kit for -6 -8 and -10. Kinda pricey at a penny under 80 bucks. The combo that does from -4 to -16 goes for a penny under 150 bucks. As a guy in my club said, "kind of expensive for a box of plastic bottles".
    The electric valve goes to a toggle switch (when I finish tidying up everything) which will be powered by the ignition switch. That way I can turn off the switch and 'seal' in the stored oil at a higher volume/pressure before I cut off the engine, which at idle will be below the running 60 PSI.
    I haven't tried opening the accusump valve to see how long it will discharge its oil before the pressure drops to zero. I'll have to try it and get back to you. And my cylinder is only a 2 quart. Figure that should be adaquate for my ride. My oil thermostat is a piece of plastic that I close off the chin opening in front of the cooler Works well
    To cut the braided hose, I use the procedure Patrick mentioned. I use my dremel tool with P/N 426 reinforced cut-off wheels. Masking tape works to keep the cut braids from fraying and you can draw a nice cut line around the hose to guide the cut off wheel.
    - Jim -
    Jim Harding
    #4279512 - SA452 - TKO600
    #3004 - 302 - 4 speed
    La Plata, Maryland

  8. #8
    Join Date
    Dec 2004
    Location
    Prince Frederick, Maryland, USA.
    Posts
    1,561
    Nice work Jim.
    Tony
    Unique 427 #4279480 Precision Engine Machine Company 427 s/o 483.47 stroker close ratio toploader 3.31 jag rear

  9. #9
    Join Date
    Jul 2003
    Location
    Portsmouth, VA, USA.
    Posts
    94

    Red face

    FYI: the Koul Tool is available at Summit but doesn't come in the "medium" size, so if you have both 8 and 10 AN hoses on your car, like me, you have to buy the small and the large set or go to Pegasus and get the medium. Also, while rambling around the internet one day I came across a great way to cut SS hose. Buy a thick chunk of aluminum or brass to use as an anvil, a cheap bricklayer's chisel and a hand-held sledge. Sharpen the chisel on your grinder, mark the hose and strike it with the chisel and hammer. It cuts clean with no residue to clean out of the hose. Don't use wood or iron as your anvil as it won't cut clean.
    Bill Stradtner, Portsmouth, VA
    427 S/C #9442
    427W Dart "Replica" Ford Engine

  10. #10
    Join Date
    Apr 2010
    Location
    Navarre, Florida
    Posts
    284
    Quote Originally Posted by sllib View Post
    FYI: the Koul Tool is available at Summit but doesn't come in the "medium" size, so if you have both 8 and 10 AN hoses on your car, like me, you have to buy the small and the large set or go to Pegasus and get the medium. Also, while rambling around the internet one day I came across a great way to cut SS hose. Buy a thick chunk of aluminum or brass to use as an anvil, a cheap bricklayer's chisel and a hand-held sledge. Sharpen the chisel on your grinder, mark the hose and strike it with the chisel and hammer. It cuts clean with no residue to clean out of the hose. Don't use wood or iron as your anvil as it won't cut clean.

    Bill... I saw the same internet video.... YouTube I believe? That's what I plan to do. I already sharpend an old brick chisel and I have the alum block, so should be all set. If I "screw" that up.... I'll revert to my Dremil tool
    Mark
    427 S/C, Flame Yellow, B2 Motorsports 427ci Stroker Dart SBF, TKO600, 3.73 Posi, Avon tires and so much more.

  11. #11
    Join Date
    Nov 2003
    Location
    La Plata, Maryland, USA.
    Posts
    421
    Hey Mike, finally getting back to your question of how long it takes to empty the accusump. When filled with 'cold' oil, it will store it at around 60 psi. Hitting the discharge switch, the two quarts will empty in just under 20 seconds. At running temps, the thing will dump it load in a little under 10 seconds. Pre load on the accusump is 10 psi (give or take) so I'm timing until the gauge on the accusump drops to 10.

    Would have had this info earlier had I not decided to replace the bronze dizzy gear. Took a little longer than I thought
    Jim Harding
    #4279512 - SA452 - TKO600
    #3004 - 302 - 4 speed
    La Plata, Maryland

  12. #12
    Join Date
    Apr 2010
    Location
    Navarre, Florida
    Posts
    284
    Thanks Jim.

    Mark
    427 S/C, Flame Yellow, B2 Motorsports 427ci Stroker Dart SBF, TKO600, 3.73 Posi, Avon tires and so much more.

  13. #13
    Join Date
    Dec 2004
    Location
    Prince Frederick, Maryland, USA.
    Posts
    1,561
    Quote Originally Posted by Jim Harding View Post
    Hey Mike, finally getting back to your question of how long it takes to empty the accusump. When filled with 'cold' oil, it will store it at around 60 psi. Hitting the discharge switch, the two quarts will empty in just under 20 seconds. At running temps, the thing will dump it load in a little under 10 seconds. Pre load on the accusump is 10 psi (give or take) so I'm timing until the gauge on the accusump drops to 10.

    Would have had this info earlier had I not decided to replace the bronze dizzy gear. Took a little longer than I thought
    Jim,
    I thought they developed a gear that you didn't have to replace for the roller cams.
    Tony
    Unique 427 #4279480 Precision Engine Machine Company 427 s/o 483.47 stroker close ratio toploader 3.31 jag rear

  14. #14
    Join Date
    Nov 2003
    Location
    La Plata, Maryland, USA.
    Posts
    421
    Quote Originally Posted by Naumoff View Post
    Jim,
    I thought they developed a gear that you didn't have to replace for the roller cams.
    Hi Tony, from what I've researched, the composite gear is not yet made for the FE with a steel solid roller cam. I've heard of a steel gear that is available, but read some talk that the difference in the steels make up could do as much damage as using an iron gear. So I just pressed on a new bronze one and will check it for wear every now and then. The old one probably would have lasted a few hundred miles, but it did show visual and measurable wear, so I swapped it out.
    Interesting information on the MSD instructions They say that pressing a new gear onto the dizzy shaft and aligning it over the original holes "is possible" but suggest that the new gear be lined up 90 degrees from the drilled hole in the shaft, and then drill another hole to secure the new gear. Has to make you shake your head... just how many gears can you change before the shaft is destroyed? I took careful care pressing the gear on and managed to use the original holes. Just a slight misalignment was corrected with a tapered dowel pin I made from an old .125 drill bit. Good for another few thousand miles now
    Jim Harding
    #4279512 - SA452 - TKO600
    #3004 - 302 - 4 speed
    La Plata, Maryland

  15. #15
    Join Date
    Dec 2004
    Location
    Prince Frederick, Maryland, USA.
    Posts
    1,561
    Quote Originally Posted by Jim Harding View Post
    Hi Tony, from what I've researched, the composite gear is not yet made for the FE with a steel solid roller cam. I've heard of a steel gear that is available, but read some talk that the difference in the steels make up could do as much damage as using an iron gear. So I just pressed on a new bronze one and will check it for wear every now and then. The old one probably would have lasted a few hundred miles, but it did show visual and measurable wear, so I swapped it out.
    Interesting information on the MSD instructions They say that pressing a new gear onto the dizzy shaft and aligning it over the original holes "is possible" but suggest that the new gear be lined up 90 degrees from the drilled hole in the shaft, and then drill another hole to secure the new gear. Has to make you shake your head... just how many gears can you change before the shaft is destroyed? I took careful care pressing the gear on and managed to use the original holes. Just a slight misalignment was corrected with a tapered dowel pin I made from an old .125 drill bit. Good for another few thousand miles now
    Jim, that is so you have to buy a new shaft and replace it.
    Tony
    Unique 427 #4279480 Precision Engine Machine Company 427 s/o 483.47 stroker close ratio toploader 3.31 jag rear

  16. #16
    Join Date
    Nov 2003
    Location
    La Plata, Maryland, USA.
    Posts
    421
    Quote Originally Posted by Naumoff View Post
    Jim, that is so you have to buy a new shaft and replace it.
    Yeah, you're right. I guess you could get by if you had to drill just one more hole in the shaft. Even with one more hole, it has to weaken the shaft and make it more prone to failure, but can you imagine a third hole? Don't ya just love working on these cars
    Saw the other post where you just picked up a new GT. That car has to give you a rush too. I bought JoAnn a used 2010 GT with 3000 miles on the clock. Previous owner did a primo job creating a GT500 clone. Only thing missing is the extra pony's under the hood. Take care man, we have to get together some weekend for a run on some of the back roads of Southern Maryland.
    Jim Harding
    #4279512 - SA452 - TKO600
    #3004 - 302 - 4 speed
    La Plata, Maryland

  17. #17
    Join Date
    Dec 2004
    Location
    Prince Frederick, Maryland, USA.
    Posts
    1,561
    Quote Originally Posted by Jim Harding View Post
    Yeah, you're right. I guess you could get by if you had to drill just one more hole in the shaft. Even with one more hole, it has to weaken the shaft and make it more prone to failure, but can you imagine a third hole? Don't ya just love working on these cars
    Saw the other post where you just picked up a new GT. That car has to give you a rush too. I bought JoAnn a used 2010 GT with 3000 miles on the clock. Previous owner did a primo job creating a GT500 clone. Only thing missing is the extra pony's under the hood. Take care man, we have to get together some weekend for a run on some of the back roads of Southern Maryland.
    Nitros
    Yeah that 5.0 is pretty awesome. I love it. Made me think for a minute why I needed the Cobra but then I took her for a drive and I said to myself and self said you big dummy this is why.


    Tony
    Unique 427 #4279480 Precision Engine Machine Company 427 s/o 483.47 stroker close ratio toploader 3.31 jag rear

  18. #18
    Join Date
    Jan 2003
    Location
    Harrisburg, PA, USA.
    Posts
    657
    Real fine ride Tony.

    - Geary

  19. #19
    Join Date
    Dec 2004
    Location
    Prince Frederick, Maryland, USA.
    Posts
    1,561
    Thanks Geary
    Tony
    Unique 427 #4279480 Precision Engine Machine Company 427 s/o 483.47 stroker close ratio toploader 3.31 jag rear

Posting Permissions

  • You may not post new threads
  • You may not post replies
  • You may not post attachments
  • You may not edit your posts
  •